This page is outdated; a more recent version of the tutorial is available on this blog.
This blog entry has been integrated into Spyder as the Tutorial. Once Spyder has started, the most up-to-date version of this tutorial can be found under Help -> Spyder tutorial.
See the Spyder website for more information and documentation on the IDE.
Outdated document begins:
Hans Fangohr, University of Southampton, UK, 2013
Spyder has developed into a fairly mature and very productive tool; here I try to provide a tutorial. This documentation is motivated by training courses in Python and computational modelling for students at the University of Southampton (see historical note for more detail).
This blog entry has been integrated into Spyder as the Tutorial. Once Spyder has started, the most up-to-date version of this tutorial can be found under Help -> Spyder tutorial.
Outline
- 1 First steps with Spyder
- 2 Recommended first steps for Python beginners
- 3 Selected Preferences
- 4 Shortcuts for useful functions
- 5 Run Settings
- 6 Other observations
- 7 Docstring formatting
- 8 Debugging in the Ipython Debugger
- 9 Plotting
- 10 Historical note
- 11 Versions
1 First steps with Spyder
1.1 Execute a given program
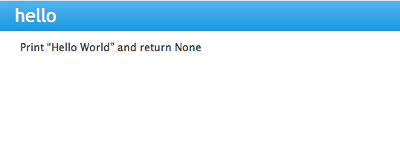
Get the hello world file into the Spyder editor window by either
- Download hello.py and save as hello.py. (You download the file by right-clicking on the link in your browser, then select Save Target As or Save Download as), and then
- Open the file hello.py via the File menu, then select Open. We express this as File -> Open in short.
or
- click on hello.py to see the source code in the webbrowser, then copy the whole code
- navigate to the editor window in spyder and paste the code. Then save the file as hello.py.
To execute the program, select Run -> Run (or press F5), and confirm the Run settings if required.
You should see output like:
Hello World
>>>
or (the particular path will depend on where you have saved the file, but this is inserted by Spyder automatically):
>>> runfile('/Users/fangohr/Desktop/hello.py', wdir=r'/Users/fangohr/Desktop')
Hello World
>>>
If so, then you have just run your first Python program - well done.
1.1.1 Start IPython
Before we proceed, please
-
The IPython console can do a little more than the standard Python console, and we suggest to use it as the default console here.
In the IPython interpreter session that we have just started, you can use Run->Run (as before) to execute hello.py and you should see:
In [1]: runfile('/Users/fangohr/Desktop/hello.py', wdir='/Users/fangohr/Desktop')
Hello World
1.1.2 Background information: What happens when you execute the program?
Python reads the file line by line, ignoring comments
when it comes across the def keyword, it knows that a function is DEFined in this and the next (one or more) lines. In the hello.py file, Python thus creates a function object with name hello. All indented lines following def hello(): belong to the function body.
Note that the function object is just created at this point in the file, but the function is not yet called (i.e. not executed).
when Python comes across commands (other than def ... and a few other keywords) that are written in the left-most column, it will execute these immediately. In the hello.py file this is only the line reading hello() which will actually call (i.e. execute) the function with name hello.
If you remove the line hello() from the program and run the whole file again (by pressing F5, or selecting run -> run), nothing will be printed (because the function hello is defined, but not called, i.e. not executed).
Now you should know how to execute a Python program that you have in the editor window in Spyder using the Python Console, and the more sophisticated IPython Console.
If you are just starting to learn Python, this is probably a good point to return to your text book / course and look at more basic examples.
The next section gives more detailed information how you can execute parts of the code in the editor in the Python console, and thus update parts of your definitions in the editor. This is a more advanced technique but can be very useful. (You may also be interested in the option to execute chunks (so-called "cells") of code that are seperated by delimiters -- see Shortcuts for useful functions.)
1.2 Call existing function objects from the command line
Once you have executed the hello.py program, the function object hello is defined and known at the Python prompt. We can thus call the function from the Python prompt:
Call the hello() function from the Python prompt, i.e. type hello() in the Python Shell window (the Python prompt shows as >>>, or as In [?] if we use the IPython session where the question mark can be any positive integer number.), and press the return key.
You should find that the hello() function is executed again, i.e. Hello World is printed again. Your function call at the Python prompt together with the output should look like this:
In [ ]: hello()
Hello World
Can you see how this differs from executing the whole program again?
When we execute the whole program (by pressing F5), Python goes through the file, creates the hello function object (overriding the previous object), reaches the main program and calls the function.
When we call hello() from the Python prompt, we only call the function objects hello that has been defined in the (I)Python console when we executed the whole hello.py file earlier (by pressing F5).
This will become clearer over time and also when we work with slightly larger examples. You may want to return to this tutorial at a slightly later stage.
1.3 Inspecting objects
Python provides a function that displays all known objects (in the current name space). It is called dir(): when you type dir() at the prompt, you get a list of known objects. Ignore everything starting with an underscore for now. Can you see hello in the list?
(If you get a long list of defined objects, then Spyder may have done some convenience imports for you already. To address this you may want to:
- Reset the name space (you may want to follow instructions at No convenience imports in IPython Console to change the default settings)
- execute the file hello.py again by pressing F5
Then run dir() as suggested above. )
Once an object is visible in the current name space (as is hello in this example), we can use the help function as follows to learn about it: Type help(hello) at the Python prompt, you should see output like this:
In [ ]: help(hello)
Help on function hello in module __main__:

hello()
    Print "Hello World" and return None
Where does Python take the information from? Some of it (like the number of input arguments and names of those variables; here we have no input arguments) Python can find through inspecting its objects, additional information comes from the documentation string provided for the function object hello. The documentation string is the first string immediately below the line def hello():.
The Spyder environment also provides a panel in the top right corner (by default) which is the Object inspector. If you type hello into the empty line in the Object inspector window, it will also provide the help string.
1.4 Updating objects
1.4.1 Simple strategy: re-execute whole program
In the Editor window, change the function hello so that it prints Good Bye World rather than Hello World.
Press F5 (to execute the whole program) and check that the output of the program is now:
Good Bye World
What has happened when you pressed F5 is this: Python has gone through the hello.py file and created a new function object hello (overriding the function object hello we had defined before) and then executed the function.
1.4.2 Looking at the details
We need to start with a clearly defined state. To do this, please change the function hello() back so that it prints Hello World (i.e. use the original hello.py file), then press F5 to run the whole program and check that it prints Hello World.
Call the function hello() from the command prompt (as described in Call existing function objects from the command line). You should see Hello World printed.
Now change the function definition so that it would print Laters World, and save the file (but do NOT execute the program, i.e. do NOT press F5 yet).
Call the function hello() from the command prompt again. You should find that the text printed reads Hello World, like here
In [ ]: hello()
Hello World
Why is this so? Because the hello function object in the Python interpreter is the old one which prints Hello World. So far, we have changed the file hello.py (and replaced Hello World in there with Laters World) in the editor but this has not affected the objects that have previously been created in the Python interpreter.
Here are two possibilities to use our modified version of the hello function:
Option 1: execute the whole file hello.py again by pressing F5: this creates a new function object hello (and overrides the old one). You should find that if you press F5, and then call hello() at the prompt, the new text Laters World is printed.
Option 2: select the region you have changed (in this case the whole function hello, starting from the line def hello(): down to return None, and then select Run -> Run selection.
This will update the hello object in the interpreter without having to execute the whole hello.py file:
In [ ]: def hello():
   ...:     """Print "Hello World" and return None"""
   ...:     print("Laters world")
   ...:
If we now type hello(), we see the update response:
In [ ]: hello()
Laters world
The ability to execute parts of the code to update some objects in the interpreter (in the example above, we updated the function object hello), is of great use when developing and debugging more complex codes, and when creating objects/data in the interpreter session take time. For example, by modifying only the functions (or classes/objects, etc) that we are actually developing or debugging, we can keep re-using the data structures etc that are defined in the interpreter session.
2 Recommended first steps for Python beginners
To teach Python programming and computational modelling, we recommend to (i) use IPython instead of the normal Python interpreter and (ii) not use any convenience imports. This accepts IPython as the de-facto standard and helps to better understand namespaces.
Spyder tries to help more advanced users by importing a number of modules into the main name space. Type scientific in the command prompt to see the details. This behaviour may change in future Spyder releases.
While these convenience imports are very useful for more experienced programmers, they can be confusing (if not misleading) for beginners. We thus recommend to undo these imports to fulfil our requirements outline above and to (i) switch to an IPython console, and (ii) issue the %reset command to reset the name space. Both steps are explained in more detail in the next section.
2.1 Switch to an IPython console
In the console window (lower right corner by default), you see by default a prompt with three greater than signs, i.e. >>>. This shows that we are using the console -- basically a normal Python interpreter session (with some added functionality from Spyder).
Instead, we would like to use an Interactive Python shell, short IPython from the ipython project. To do this, select Interpreters -> Open an IPython Console.
You should see in the consolse window a new shell appearing, and the IPython prompt In [1]: should be displayed.
See also: Change Spyder settings to always start with an IPython shell
2.2 Reset the name space
The name space can be cleared in IPython using the %reset command. Type %reset and press return, then confirm with y:
In [1]: %reset

Once deleted, variables cannot be recovered. Proceed (y/[n])? y

In [2]:
That's all.
We discuss this a little further, but you can skip the following if you are not interested: After issuing the %reset command, we should have only a few objects defined in the namespace of that session. We can list all of them using the dir() command:
In [2]: dir()
Out[2]:
['In',
 'Out',
 '__builtin__',
 '__builtins__',
 '__name__',
 '_dh',
 '_i',
 '_i2',
 '_ih',
 '_ii',
 '_iii',
 '_oh',
 '_sh',
 'exit',
 'get_ipython',
 'help',
 'quit']
Finally, if you like to skip the confirmation step of the reset command, use can use %reset -f instead of %reset.
2.3 Strive for PEP8 Compliance
In addition to the Syntax that is enforced by Python, there are additional conventions regarding the layout of sourcecode, in particular the Style Guide for Python source code knows as "PEP8".
You should change Spyders settings to Warn if PEP8 coding guidelines are violated.
3 Selected Preferences
3.1 Where are the preferences?
A lot of Spyder's behaviour can be configured through it's Preferences. Where this is located in the menu depends on your operating system:
- On Windows and Linux, go to Tools -> Preferences
- On Mac OS, go to Python -> Preferences
3.2 Change Spyder settings to always start with an IPython shell
Go to Preferences -> IPython console -> Startup and select the tickbox next to Open an IPython console at startup. Then click the OK button.
The next time Spyder starts, it will show the IPython console automatically.
3.3 Warn if PEP8 coding guidelines are violated
Go to Preferences -> Editor -> Code Introspection/Analysis and select the tickbox next to Style analysis (PEP8)
3.4 No convenience imports in Python Console
To avoid any 'magic' when the console is started, go to
Preferences -> Console -> Advanced Settings -> PYTHONSTARTUP replacement and select Default PYTHONSTARTUP script (and restart Spyder).
(This magic, amongst other things, runs the from __future__ import division command.)
The default settings may change for this in the next major release.
3.5 No convenience imports in IPython Console
To avoid import of all objects from pylab and numpy into the current name space in the IPython Console, go to Preferences -> IPython console -> Graphics and deselect the tickbox next to Automatically load Pylab and NumPy modules and also deselect Activate support.
The default settings may change for this in the next major release.
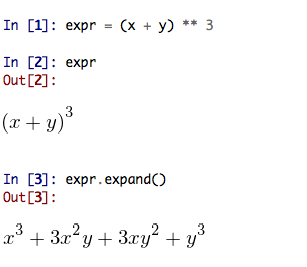
3.6 Automatic Symbolic Python
Through Preferences -> IPython console -> Advanced Settings -> Use symbolic math we can activate IPython's symbolic python mode. This will allow nicely rendered sympy output (latex style) and also imports some sympy objects automatically when the IPython console starts, and reports what it has done.
These commands were executed:
>>> from __future__ import division
>>> from sympy import *
>>> x, y, z, t = symbols('x y z t')
>>> k, m, n = symbols('k m n', integer=True)
>>> f, g, h = symbols('f g h', cls=Function)
We can then use the variables x, y, for example like this:
4 Shortcuts for useful functions
F5 executes the current buffer
F9 executes the currently highlighted chunk of code: this is very useful to update definitions of functions (say) in the interpreter session without having to run the whole file again
CTRL + <RETURN> executes the current cell (menu enty Run -> Run cell). A cell is defined as the code between two lines which start with the agreed tag #%%.
SHIFT + <RETURN> executes the current cell and advances the cursor to the next cell (menu entry Run -> Run cell and advance).
Cells are useful to execute a large file/code segment in smaller units. (It is a little bit like a cell in an IPython notebook, in that chunks of code can be run independently.)
ALT + <CURSOR UP> moves the current line up. If multiple lines are highlighted, they are moved up together. ALT+<CURSOR DOWN> works correspondingly moving line(s) down.
Right clicking on a function/method in the source, opens a new editor windows showing the definition of that function.
SHIFT+CTRL+ALT+M maximises the current window (or changes the size back to normal if pressed in a maximised window)
SHIFT+CTRL+F activates the search across all files.
On Mac OS X: CMD + + will increase the font size in the editor, CMD + - decrease. Also works in the IPython Console.
The font size for the object explorer, the Python console etc can be set individually via Preferences -> Object explorer etc.
I couldn't find a way of changing the font size in the variable explorer.
CTRL+SPACE autocompletes commands, function names, variable names, methods; very useful.
CMD+s (on Mac OS X) and CTRL+s (otherwise) in the editor window saves the file currently being edited. This also forces various warning triangles in the left column of the editor to be updated (otherwise they update every 2 to 3 seconds by default).
CMD+s (on Mac OS X) and CTRL+s (otherwise) in the IPython console window saves the current IPython session as an HTML file, including any figures that may be displayed inline. This is useful as a quick way of recording what has been done in a session.
(It is not possible to load this saved record back into the session - if you need functionality like this, look for the IPython Notebook.)
CMD+i (on Mac OS X) and CTRL+i (otherwise) when pressed while the cursor is on an object, opens documentation for that object in the object inspector.
5 Run Settings
These are the settings that define how the code in the editor is executed if we select Run -> Run or press F5.
By default, the settings box will appear the first time we try to execute a file. If we want to change the settings at any other time, they can be found under Run -> Configure or by pressing F6.
There are three choices for the interpreter to use, of which I'll discuss the first two. Let's assume we have a program hello.py in the editor which reads
def hello(name):
    """Given an object 'name', print 'Hello ' and the object."""
    print("Hello {}".format(name))


i = 42
if __name__ == "__main__":
    hello(i)
5.1 Execute in current Python or IPython interpreter
This is the default suggestion, and also generally a good choice.
5.1.1 Persistence of objects I (after code execution)
Choosing Execute in current Python or IPython interpreter setting under Run -> Configure means that
When the execution of hello.py is completed, we can interact with the interpreter in which the program ran, and we can use the convenient IPython interpreter for this (rather than the default Python interpreter).
In particular,
we can inspect and interact with objects that the execution of our program created, such as i and hello().
This is generally very useful for incremental coding, testing and debugging: we can call hello() directly from the interpreter prompt, and don't need to execute the whole hello.py for this (although if we change the function hello(), we need to execute the buffer, or at least the function definition, to make the new version of hello() visible at the interpreter; either by executing the whole buffer or via Run -> Run Selection.)
5.1.2 Persistence of objects II (from before code execution)
However, executing the code in the editor in the current interpreter also means that
- the code that executes can see other (global) objects that were defined in the interpreter session.
This persistence of objects is easily forgotton and usually not required when working on small programs (although it can be of great value occasionally). These objects could come from previous execution of code, from interactive work in the interpreter, or from convenience imports such as from pylab import * (Spyder may do some of those convenience imports automatically).
This visibility of objects in the interpreter global name space to the code we execute may also result in coding mistakes if the code inadvertently relies on these objects.
Here is an example: imagine that
- we run the code hello.py. Subsequently, the variable i is known in the interpreter as a global variable.
- we edit the hello.py source and accidentally delete the line i = 42
- we execute the buffer containing hello.py again. At this point, the call of hello(i) will not fail because the interpreter has an object of name i defined, although this is not defined in the source of hello.py.
At this point, we could save hello.py and (falsely) think it would execute correctly. However, running it in a new python interpreter session (or via python hello.py, say) would result in an error, because i is not defined.
The problem arises because the code makes use of an object (here i) without creating it. This also affects importing of modules: if we had imported pylab at the IPython prompt, then our program will see that when executed in this IPython interpreter session.
To learn how we can double check that our code does not depend on such existing objects, see How to double check your code executes correctly "on its own" .
5.2 Execute in new dedicated Python interpreter
Choosing Execute in new dedicated Python interpreter under Run -> Configure will start a new Python interpreter everytime the hello.py program is executed. The major advantage of this mode over Execute in current Python or IPython interpreter is that we can be certain that there are no global objects defined in this interpreter which originate from debugging and repeated execution of our code: every time we run the code in the editor, the python interpreter in which the code runs is restarted.
This is a safe option, but provides less flexibility and cannot use the IPyton interpreter.
5.3 How to double check your code executes correctly "on its own"
Assuming you have chosen for your code to Execute in current Python or IPython interpreter, then you two options to check that our code does work on its own (i.e. it does not depend on undefined variables, unimported modules and commands etc.)
Switch from Execute in current Python or IPython interpreter to Execute in new dedicated Python interpreter, and execute the code in the editor in this dedicated Python interpreter.
Alternatively, if you want to stay with the current IPython interpreter, you can
Use IPython's magic %reset command which will remove all objects (such as i in the example above) from the current name space, and then execute the code in the editor.
5.4 Recommendation
My recommendation for beginners would be to Execute in current Python or IPython interpreter, and to chose the IPython interpreter for this (see also Change Spyder settings to always start with an IPython shell).
Once you have completed a piece of code, double check that it executes independently using one of the options explained in How to double check your code executes correctly "on its own".
6 Other observations
6.1 Multiple windows
When multiple files are opened in the editor, the corresponding tabs at the top of the window area are arranged in alphabetical order of the filename from left to right.
On the left of the tabs, there is as icon that shows Browse tabs if the mouse hovers over it. It is useful to jump to a particular file directly, if many files are open.
6.2 Environment variables
Environment variables can be displayed from the Console window (bottom right window in default layout). Click on the Options icon (the tooltip is Options), then select Environment variables.
6.3 Reset all customisation
All customisation saved on disk can be reset by calling spyder from the command line with the switch --reset, i.e. a command like spyder --reset.
6.4 Objects in the variable explorer
Right-clicking on arrays in the variable explorer gives options to plot and analyse these further.
Double clicking on a dictionary object opens a new window that displays the dictionary nicely.
Presumably there is other 'hidden' capability for some other data types.
7 Docstring formatting
There are some conventions assumed regarding documentation strings written in restructured text. If we follow those guidelines, we can obtain beautifully formated documentation strings in Spyder.
For example, to get our average() function look like this in the Spyder Object explorer:
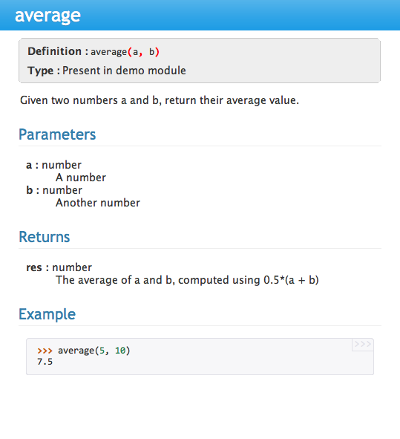
We need to format the documentation string as follows
def average(a, b):
    """
    Given two numbers a and b, return their average value.

    Parameters
    ----------
    a : number
      A number
    b : number
      Another number

    Returns
    -------
    res : number
      The average of a and b, computed using 0.5*(a + b)

    Example
    -------
    >>> average(5, 10)
    7.5

    """

    return (a + b) * 0.5
What matters here, is that the word Parameters is used, and underlined. The line a : number shows us that the type of the parameter a is number. In the next line, which is indented, we can write a more extended explanation what this variable represents, what conditions the allowed types have to fulfil etc.
The same for all Parameters, and also for the returned value.
Often it is a good idea to include an example as shown.
8 Debugging in the Ipython Debugger
8.1 Line by line step execution of code
Activating the debug mode (Debug -> Debug) starts the IPython debugger (ipdb) in the IPython console. This is operated as normal, but the editor display window highlights the line that is about to be executed, and the variable explorer displays variables in the current context of the point of program execution. (It only displays 'numerical' variables, i.e. not function objects etc.)
The key commands within the IPython debugger are indivdual keystrokes:
- s to Step into the current statement. If this is a function call, step into that function.
- n move to the Next statement. If the current statement is a function, do not step into that function, but execute it completely before returning control to the interactive debugger prompt.
- r complete all statements in the current function and Return from that function before returning control.
- p Print allows to display values of variables, for example p x will print the value of the variable x.
Note that at the ipdb, you can also change values of variable. For example, to modify a valiable x, you can say ipdb > x = 42 and the debugger will carry on with x being bound to 42. You can also call functions, and do many others things.
To leave the debugging mode, you can type exit or select from the menu Debug -> Debugging Control -> Exit
8.2 Debugging once an exception has occured
In the IPython console, we can call %debug straight after an exception has been raised: this will start the IPython debug mode, and allows inspection of local variables at the point where the exception occurred as described above. This is a lot more efficient than adding print statements to the code an running it again.
If you use this, you may also want to use the commands up and down which navigate the inspection point up and down the stack. (Up the stack means to the functions that have called the current function; down is the opposite direction.)
9 Plotting
Assuming we use an IPython console with version >= 1.0.0, we can decide whether figures created with matplotlib/pylab will show
- inline, i.e. inside the IPython console, or whether they should
- appear inside a new window.
Option 1 is convenient to save a record of the interactive session (section Shortcuts for useful functions lists a shortcut to save the IPython console to an html file).
Option 2 allows to interactively zoom into the figure, manipulate it a little, and save the figure to different file formats via the menu.
The command to get the figures to appear inline in the IPython console is %matplotlib inline.
The command to get figures appear in their own window (which technically is a QT windown) is %matplotlib qt.
The Spyder preferences can be used to customise the default behaviour (in particular Preferences -> IPython Console -> Graphics -> Activate Support to switch into inline plotting).
10 Historical note
This tutorial is based on notes by Hans Fangohr, that are used at the University of Southampton to teach Python for computational modelling to undegraduate engineers and postgraduate PhD students for the Next Generation Computational Modelling doctoral training centre.
11 Versions
11.1 Spyder version
The notes above have been created in September 2013 with Spyder 2.2.14 on Mac OS, installed via Anaconda.
Additions after 18 October 2013 tested with Spyder 2.2.4 and IPython 1.0.0.
11.2 Changes
22 September 2013: Update location of preferences, add notes on debugger and variable explorer.
23 September 2013: Add section on run settings.
30 September 2013: How to avoid automatic imports and other magic in Python and IPython console added.
18 October 2013: Add %matplotlib command, and shortcuts for executing a cell.
21 October 2013: Adding %debug after exception, Adding section "first steps", adding numbering of sections
29 December 2013: Reviewed for inclusion into Spyder, minor fixes and improvements.